Boot Iso From External Hard Disk
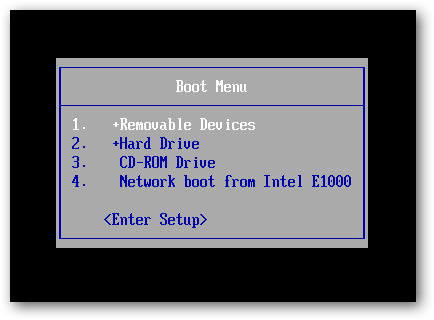
How To Install Windows 7 On USB Flash Drive or External Hard Drive. As you likely know, while one can install Windows 7 from an external hard drive, one cant install the same to an external hard drive with default settings. For all those users waiting for a good workaround to install Vista, Windows 7 and Windows Server 2. R2 to an external hard drive, here is the complete solution. Even though Windows recognizes and displays the USB hard drive in the installation screen, it doesnt allow you install Windows on the same. When you attempt to install Windows 7 on external drive, you get Windows cannot be installed to this disk error. So, if you want to install Windows 7 on an external hard drive you need to follow the steps given below. The procedure is simple but you need to install Windows Automated Installation Kit WAIK first to get some files. We would like to thank fujianabc boot land forum for this workaround. Requirements An external hard drive formatted with NTFS Windows 7 installation files if you have Windows 7 ISO use Virtual Clone Drive freeware to mount it Windows Automated Installation Kit free download from MicrosoftNOTE Make sure that you have a minimum of 1. Download Dariks Boot and Nuke for free. A hard drive disk wipe and data clearing utility. Dariks Boot and Nuke DBAN is a selfcontained boot image. Konboot remedy for forgotten passwords Windows and OSX. A hard disk image is interpreted by a Virtual Machine Monitor as a system hard disk drive. IT administrators and software developers administer them through offline. NTFS Data Recovery, Data Backup, Data Security Freeware and Shareware. Boot Disk Data Studio. Think Cell Serial Number on this page. GB free space on your external hard drive before starting the procedure. Although we are not going to delete the contents of external hard drive, we recommend backing up your external hard drive contents before trying this guide. Step 1. Create two folders named Windows Files and WAIK Files on your desktop or any other drive which has a minimum of 5 GB free space. Step 2 Download the ZIP file from here and extract the contents to WAIK Files folder. Before starting the actual installation procedure, you need to have three files Bcdboot. Bootsect. exe and Imgex. Boot Hirens Boot CD HBCD from USB as an ISO file. How to get to your Boot Menu or your BIOS settings Every PC has different hotkeys that go to these settings. You may see a list of any PC with their corresponding. These files can only be obtained by installing Windows Automated Installation Kit for Windows 7 on your Windows PC. After installing WAIK, simply search for these files in the Windows installation drive to get them. Once you have these three files, copy them to WAIK Files folder that you have created in the above step. Step 3 Copy all the contents of Windows 7 installation DVD to the Windows Files folder. Step 4 The next step is to run Installer. Administrator Right click on installer. In the first screen, you will be asked to press Enter to continue. Step 5 Press Enter key to browse to the install. Windows Files folder. The Install. wim file can be found under Sources folder Windows Files Sources install. Step 6 Now, you need to select the Windows 7 edition that you want to install on external hard drive. You can select the edition by entering the index number shown in the screen. For example, type 5 without quote and hit Enter key to select Ultimate edition. Step 7 The next step is to enter your External drives drive letter. Enter the drive letter ex L and press Enter key. Step 8 Now, type in the drive letter of your ACTIVE partition and hit Enter key. Generally C is the active partition. You can find the active partition by opening Windows Disk Management tool type diskmgmt. Start menu search area and hit enter to launch it. Step 9 Finally, the installer will ask you the drive letter that you have entered to install Windows 7 is a USB hard drive or not. As you are installing Windows 7 to an external hard drive simply type Y without quote and press Enter key. Finally click Enter key again to start extracting the Install. Kaspersky Antivirus 2009 Full New Keys'>Kaspersky Antivirus 2009 Full New Keys. This might take a few minutes. Once done, you will be asked to reboot your PC to continue the normal Windows 7 installation procedure. Step 1. 0 Reboot your PC and follow the usual Windows 7 installation procedure to complete Windows 7 installation on external hard drive. Your PC will be restarted twice or thrice during installation. Please note that the installation procedure might be slower as you are installing Windows 7 to an external hard drive. Step 1. 1 Once done with the installation, you are good to go. You can install all drivers and other software to start using the best Windows version on your PC. Note We have tested this method to install x. Windows 7 to Seagate USB external hard drive. But should work fine with x. Users who would like to carry Windows 7 on a USB flash drive can follow our how to carry Windows 7 on USB flash drive guide. UPDATE If youre having issues with this guide. Windows 7 on USB with ease guide for easy instructions. About Boot Priority Boot from CD ROM USB Flash DriveTo boot from a CD, DVD or USB device, make sure that the device has boot sequence priority over the hard drive. BIOS Boot. BIOS Basic Input Output Subsystem is a programmable chip that controls how information is passed to various devices in the computer system. A typical method to access the BIOS settings screen is to press ESC, F1, F2, F8 or F1. BIOS settings allow you to run a boot sequence from a floppy drive, a hard drive, a CD ROM drive or an external device. You may configure the order that your computer searches these physical devices for the boot sequence. The first device in the order list has the first boot priority. For example, to boot from a CD ROM drive instead of a hard drive, place the CD ROM drive ahead of the hard drive in priority. Before you set boot priority for a USB device, plug the device into a USB port. To specify the boot sequence Start the computer and press ESC, F1, F2, F8 or F1. Depending on the BIOS manufacturer, a menu may appear. Choose to enter BIOS setup. The BIOS setup utility page appears. Use the arrow keys to select the BOOT tab. System devices appear in order of priority. To give a CD or DVD drive boot sequence priority over the hard drive, move it to the first position in the list. To give a USB device boot sequence priority over the hard drive, do the following. Move the hard drive device to the top of the boot sequence list. Expand the hard drive device to display all hard drives. Move the USB device to the top of the list of hard drives. Recovery Disk D Full Vista here. Save and exit the BIOS setup utility. The computer will restart with the changed settings. Boot Priority Options. Some computer manufacturers allow you to select the device that contains the boot sequence from a special device selection menu. The example below uses a Dell system board. To set boot priority using a device selection menu When the computer starts to boot up, after the manufacturers ID screen, press F1. The device selection menu appears. Use the up and down arrows to select CD ROM or an USB Flash Drive. To boot from the selected device, press ENTER. Note Using an incorrect BIOS setting can cause a system malfunction. Please follow the BIOS guide provided with your computer motherboard. If you read these instructions and you are not sure how to change a setting, it is better to leave it as the default setting.